Connecting Invoice Data to Your ERP: Step-by-Step
Step-by-step guide to connecting invoice data to your ERP. Learn field mapping, authentication, validation, and monitoring for reliable automated integration.
Your invoice extraction works perfectly, but getting that data into your ERP requires manual export and import procedures. Each invoice cycles through the same tedious workflow your automation was supposed to eliminate.
ERP integration transforms this into continuous automated flow. Invoices extract and immediately create vendor bills in your ERP, update accounts payable records, and trigger approval workflows without manual intervention.
This guide provides the technical steps for connecting invoice data to major ERP platforms and the validation procedures that prevent data quality problems.
Understanding ERP Integration Architecture
ERP integration connects your invoice management system to your enterprise resource planning platform through defined data pathways.
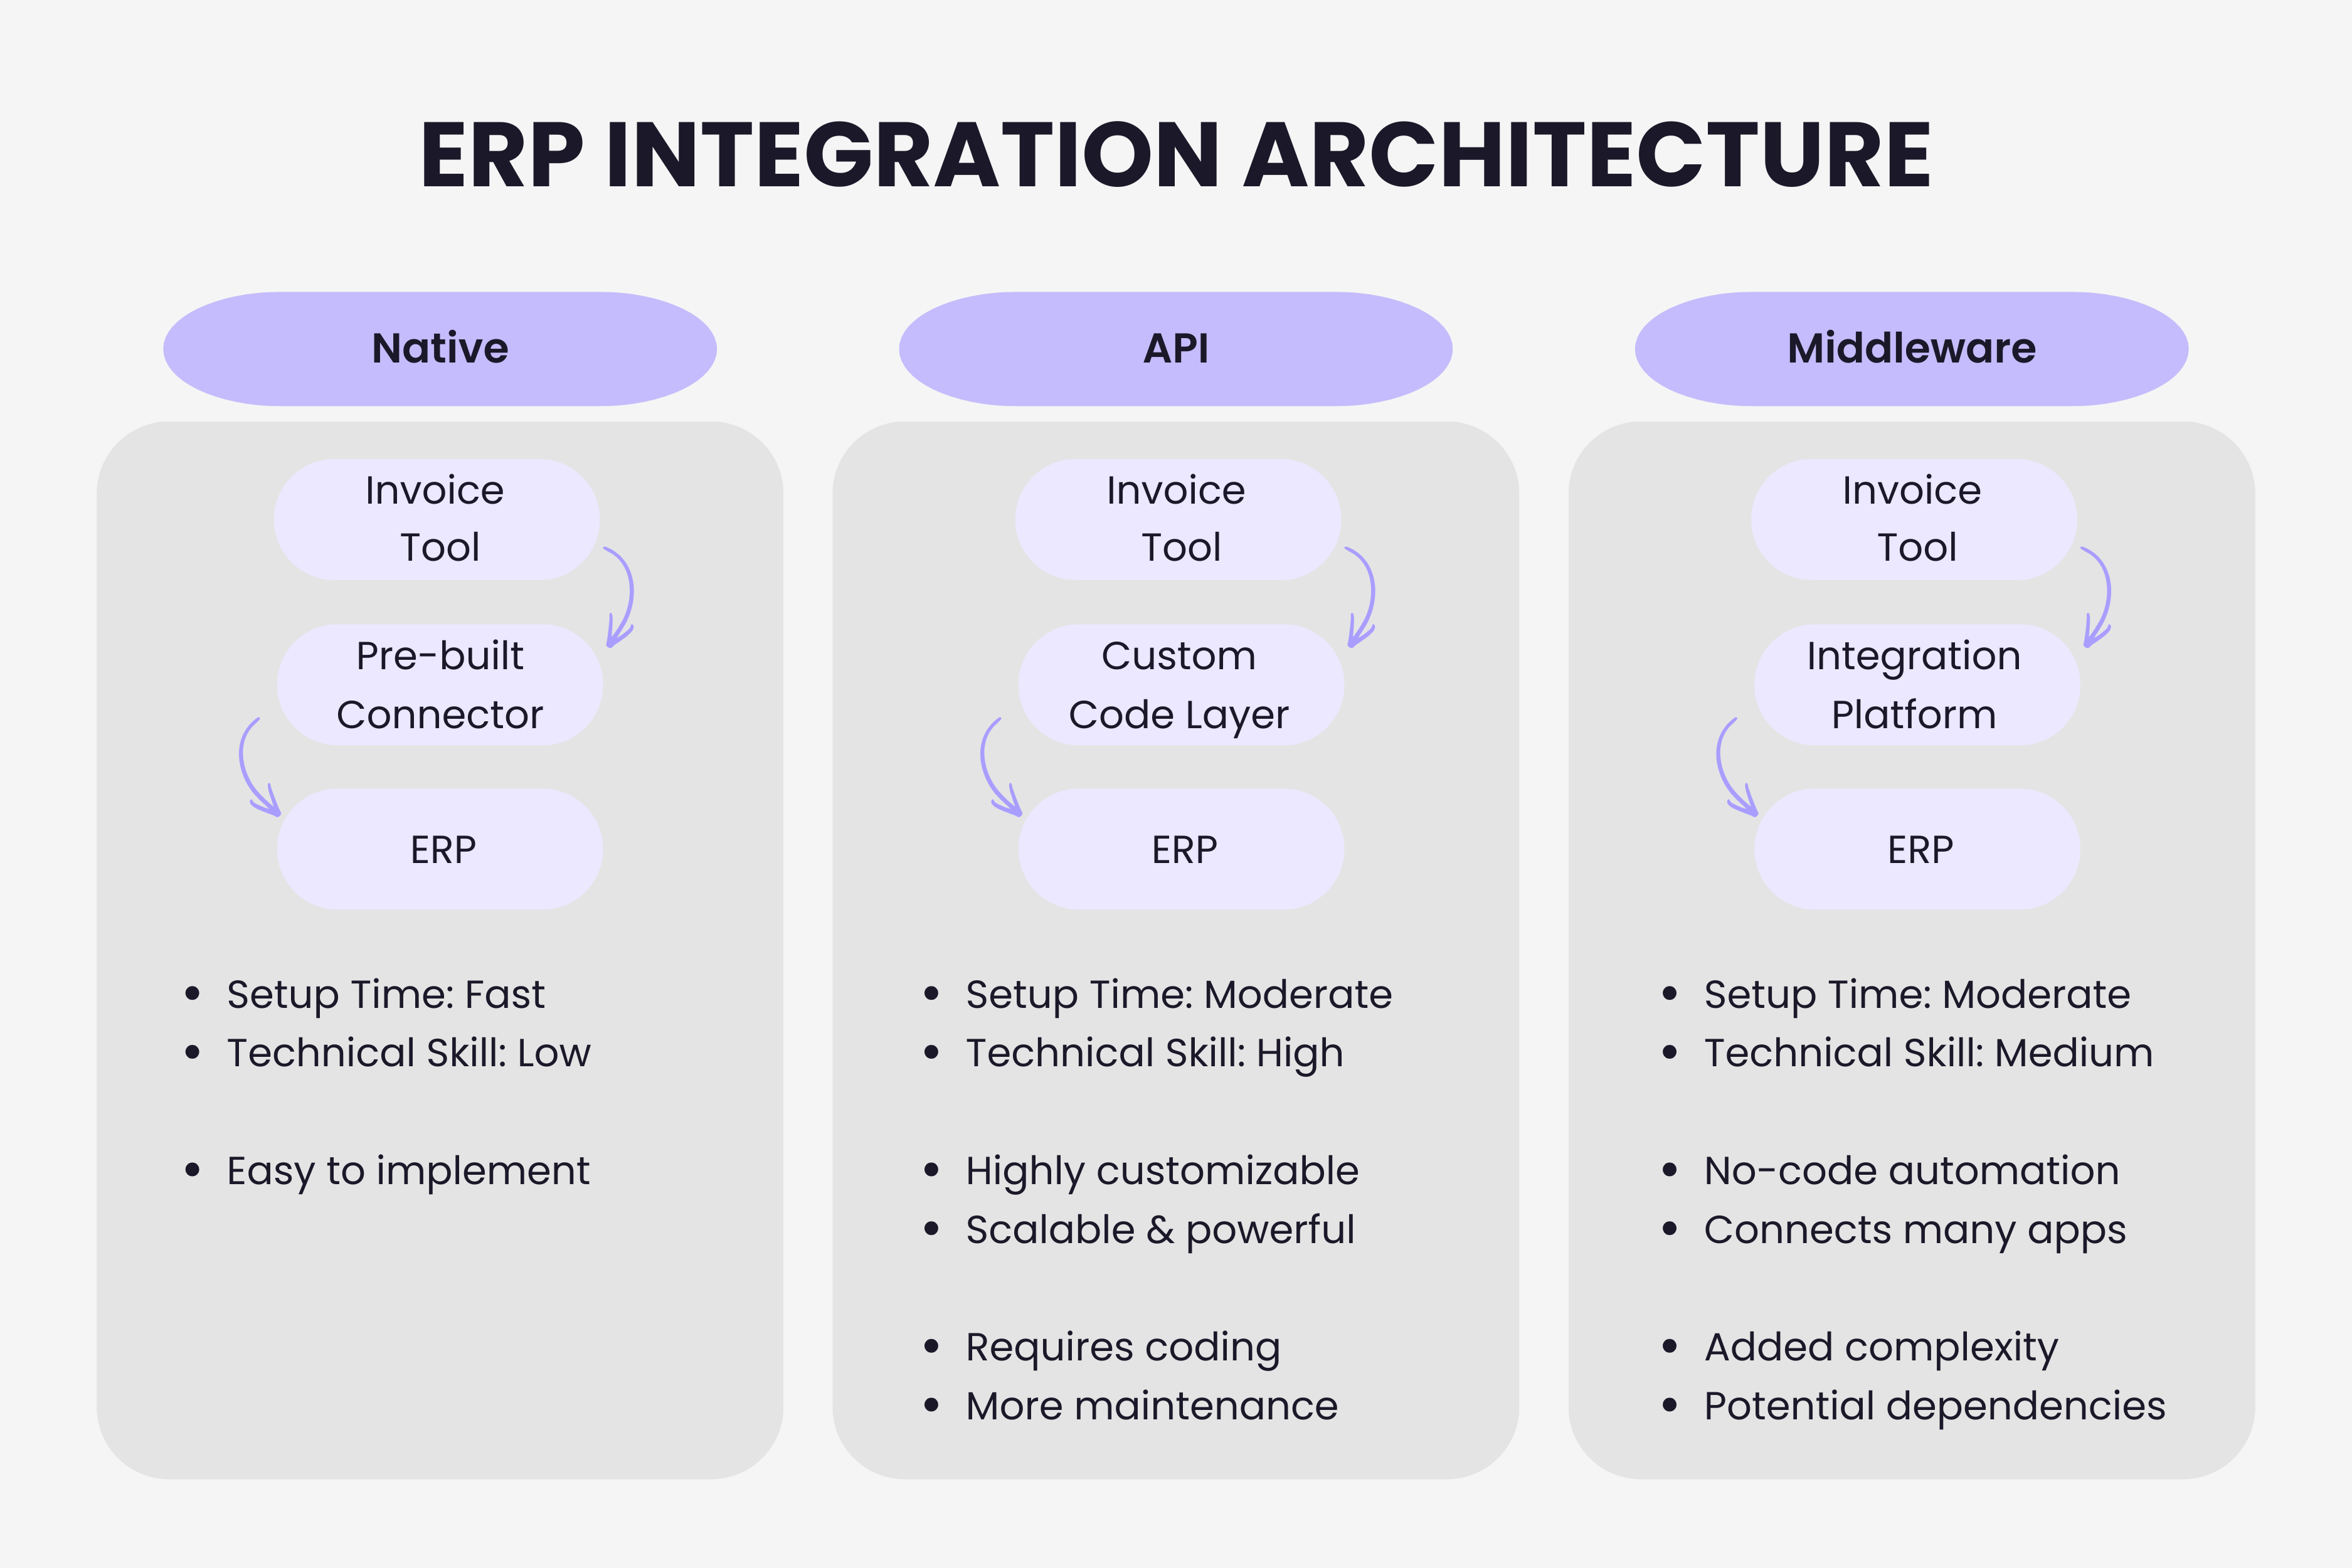
Native integrations use pre-built connectors developed specifically for your ERP platform. Setup happens quickly with documented procedures. Limitation: only exist for major ERPs like NetSuite, SAP, Oracle, and Microsoft Dynamics.
API-based integration connects systems programmatically through application programming interfaces. Maximum flexibility for custom workflows and supports any ERP with documented APIs. Requires technical resources for development and maintenance.
Middleware platforms like Zapier or Make provide visual workflow builders that connect systems without coding. Works well for standard patterns but adds dependencies and potential bottlenecks.
Step 1: Map Invoice Data to ERP Fields
Successful integration starts with understanding how invoice data translates into ERP records.
Identify required ERP fields for vendor bill creation. Most ERPs require vendor ID, invoice date, invoice number, due date, total amount, and GL account codes. Document these by creating test bills manually and noting every required field.
Match invoice fields to ERP counterparts. Invoice systems extract vendor names, but ERPs expect vendor IDs. Extraction captures totals, but ERPs might require separate subtotal, tax, and total fields. Handle format differences: dates might extract as "MM/DD/YYYY" while ERPs expect "YYYY-MM-DD". This translation layer handles format differences that would otherwise cause silent failures across connected systems.
Handle missing or unmapped data. Establish default values for optional fields. Create fallback GL codes for invoices that don't match your chart of accounts. Define how integration handles missing required fields - reject for manual review or queue for enrichment.
Account for ERP validation rules. Vendor IDs must exist in vendor master. GL account combinations must be valid. Department codes need active status. Date fields must fall within open accounting periods. Understanding these prevents integration failures.

Step 2: Configure Authentication
ERPs protect financial data through robust authentication. Integration requires properly configured access credentials.
Create dedicated integration service accounts rather than using personal credentials. Service accounts don't expire when employees leave, permissions limit to specific functions, and activity logs distinguish automated actions from manual work. Configure OAuth 2.0 credentials through your ERP's API management interface.
Set appropriate permission levels - grant only permissions necessary for invoice processing. Typical requirements: read access to vendor master, write access to vendor bills, read access to GL accounts. Avoid full administrator permissions.
Step 3: Build the Data Connection
For native integrations: Install plugin in your ERP, provide API credentials from invoice system, configure field mappings through connector interface, run initial sync tests.
For API integration: Authenticate against both APIs, retrieve invoice data in structured format, transform data according to field mappings, validate against ERP rules, post to ERP vendor bill endpoints. Implement retry logic and transaction logging. This development work follows the pattern of systematic API-first integration that modern platforms enable.
For middleware integration: Add triggers for new invoices, include data transformation steps, add validation checks, configure error alerts, implement conditional routing logic. Test thoroughly in sandbox before production deployment.
Step 4: Implement Data Validation
Validation prevents low-quality data from corrupting ERP records.
Pre-integration validation checks data before posting. Verify vendors match existing records. Confirm GL codes exist and remain active. Validate dates fall within open periods. Check invoice numbers don't duplicate.
ERP-level validation occurs during posting. ERP business rules validate subsidiary restrictions, required fields, GL combinations, and tax codes. Integration must handle failures gracefully and log with enough detail for troubleshooting.
Post-integration reconciliation confirms correct posting. Compare totals between systems. Verify invoice counts match. Regular reconciliation catches issues before month-end.
Step 5: Configure Approval Workflows
Determine routing logic: amount thresholds, GL code mappings, vendor categories, escalation procedures.
Choose approval approach: ERP-based leverages built-in workflows and mobile capabilities. External uses invoice system workflows, only posting approved invoices. Choose based on where approvers already work.
Step 6: Test Integration End-to-End
Create test scenarios: standard invoices, missing fields, multi-line items, new vendors, credit memos, foreign currency, complex tax. Execute in sandbox first.
Validate error handling: submit invalid vendor IDs, post to closed periods, create duplicates, test network disconnection. Good integrations recover gracefully.
Conduct user acceptance testing with AP teams. Train on exceptions, verify reporting, ensure manual overrides work.
Step 7: Monitor and Maintain
Track key metrics: successful post rate, processing time, failure count by type, pending approvals, reconciliation discrepancies.
Set up alerting for repeated failures, validation spikes, API unavailability, queue growth, reconciliation issues.
Schedule regular reconciliation: daily catches issues quickly, weekly identifies patterns, monthly ensures accuracy.
Maintain as systems evolve. ERPs and invoice systems update. Monitor release notes. Test after significant updates. Budget ongoing maintenance time.
Common Integration Challenges
Vendor matching difficulties: Invoice names don't match ERP records exactly. Solutions include fuzzy matching algorithms, vendor mapping tables, and automated new vendor workflows.
GL coding complexity: Invoices lack sufficient information for proper coding. Address through machine learning from historical data, default coding rules, and exception queues for manual coding.
Multi-entity complications: Invoices need posting to correct entities with entity-specific GL accounts and workflows. Robust entity determination logic prevents mis-posting.
Performance at scale: Integration handling 100 invoices monthly fails at 1,000+. API rate limits and timeouts emerge. Design for scale through batch processing, parallel processing, and queueing systems.
Modern integration approaches eliminate manual procedures that bottleneck processing. Whether implementing native connectors, custom API integration, or middleware workflows, systematic planning and thorough testing deliver automation that runs reliably at scale.
TL;DR
- ERP integration connects invoice extraction to your accounting system for automated vendor bill creation
- Three approaches: native connectors (fastest setup), API integration (most flexible), middleware platforms (no coding required)
- Field mapping is critical - translate vendor names to IDs, handle format differences, define defaults for missing data
- Use dedicated service accounts with minimum required permissions for security
- Validate data at three levels: pre-integration, ERP posting, and post-integration reconciliation
- Test thoroughly with edge cases before production: missing fields, duplicates, closed periods, network failures
- Monitor continuously with alerting on failure rates, processing times, and reconciliation discrepancies
Ready to automate your invoices?
Start extracting invoices from your email automatically with Gennai. Free plan available, no credit card required.
Start FreeRelated Articles
Invoice vs receipt: which one your accountant actually wants
Invoice vs receipt explained: the invoice records the expense and supports a VAT or GST reclaim, the receipt only proves you paid. Here is which one to keep.
GuideWhat to do when a supplier sends the wrong invoice
A supplier sent the wrong invoice? Here is what to do: identify the error, ask for a corrected invoice or credit note, and hold payment until it is right.
GuideAuto-categorize QuickBooks invoices by supplier: how AI learns your chart of accounts
Auto-categorize QuickBooks invoices by supplier: AI applies the right account, class and location to each bill at ingestion, before it ever hits your bank feed.